Categories

VG1-5 update welding in the rear barrel support

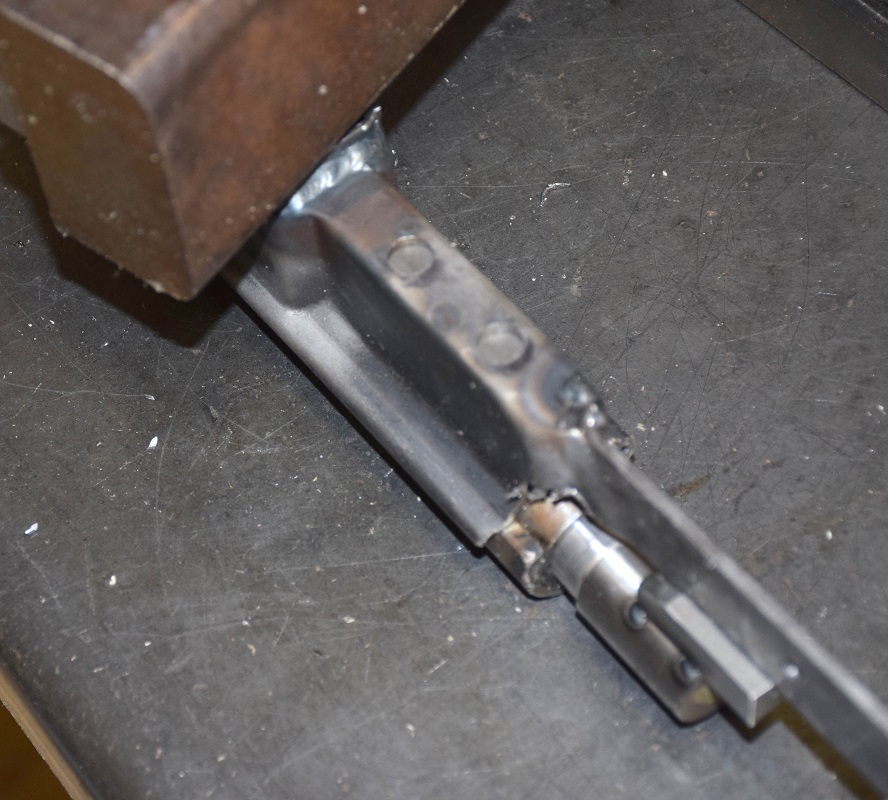
With the receiver tig welded together and the rear barrel supports completed it is now time to attach the two together. Using an alignment fixture we are able to proper align the rear barrel support with the body of the receiver and the running track of the upper receiver.

Here is a video of the process of welding the rear barrel support to the lower receiver.

Here are a couple of views of the assembly and it is placed in the receiver to be welded.

DSC_7239cs

DSC_7241sA couple of views of the fixture.

DSC_7538cs

DSC_7540csAnd a few close ups.

DSC_7539cs

DSC_7537csIt not about just designing the weapon and all of its individual parts but you also have to write the programs to make the parts and design and make the machining and welding fixtures to get it to go together correctly every time.

Things that go on at Gun Lab

I just got back into my office area this morning and looked at the pile of parts that had been studied last night and thought it would make a good what is it picture. As anyone that has been here knows we are interested in any thing gun and study everything gun. So see if you can guess what all the parts are and for what gun.

First the full size picture.

DSC_7526csNow for closer up pictures.

DSC_7529cs

DSC_7530cs

DSC_7531cs

DSC_7532cs

DSC_7533csBetter close ups.

DSC_7552cs DSC_7551cs DSC_7550cs DSC_7549cs DSC_7548cs DSC_7547cs DSC_7546cs DSC_7545cs DSC_7544cs

DSC_7551cs

DSC_7550cs

DSC_7549cs

DSC_7548cs

DSC_7547cs

DSC_7546cs

DSC_7545cs

DSC_7544cs


VG1-5 update Barrels

We have started with the first few operations on the VG1-5 barrel. When we started we were going to use the cnc lathe exclusively, but with the length of the barrel and no steady rest on the cnc lathe we had way to much chatter. So another change of plans was in order. The steps are now as follows.

Starting with a MG-13 barrel.DSC_7455csWe cut it to the closer length needed on the rifle.

DSC_7462csThen the next step is to turn it between centers to give us a spot to use the steady rest.

DSC_7459csNow with this spot machined we can use the steady rest and support the front of the barrel with a live center and turn the front of the barrel to the correct diameter.DSC_7453s


DSC_7451s

This completes this series of barrel operations on the manual lathe.

DSC_7452sFrom here we will go to the cnc lathe.

Just a quick video of the barrel on the manual lathe.


Another interesting gunsmithing site

I was doing research on rust bluing for a up coming project that I need t finish when I came across this site. It is not a how to site per say but there is a great deal of interesting information there.

http://www.finegunmaking.com/page56/page56.html

Stock making and rust bluing are two topics that he touches on that are very interesting.

Japanese type 1 paratrooper rifle

A friend of Gun Lab just obtain a Japanese type 1 paratrooper rifle and was nice enough to send pictures to share with everyone.

A little history on the type 1 is in order first.

This rifle  was developed in 1941. It was a basic modification to the type 38 carbine. To accomplish this modification the stock was cut behind the trigger guard at the wrist location. A large metal hinge was added  with a corresponding latch on the opposite side of the stock. This allowed the buttstock to be folded so that it could be transported on the solders jump pack.

The type was a limited rifle fabricated for experimental use only. It is estimated that only 200-300 pieces were made.  There are no characters or numbers noted on any of the type 1’s indicating the modification.

Now to the pictures.

Right and left views with the stock open and closed.

IMG_6593cs

IMG_6591cs

IMG_6610cs

IMG_6611cs

IMG_6608csclose up view of the latch. Unlocked and locked.

IMG_6600cs

IMG_6599csTop view of the receiver.

IMG_6597csNice mum.

IMG_6598cs

IMG_6596csMore close up pictures of the latch and hinge.

IMG_6605cs

IMG_6604cs

IMG_6606cs

IMG_6612cs

It is a rifle I would like to own and one of only two missing from my Japanese collection. I thank Greg for sharing.

Home made single shot pistol

I am kind of a sucker for single shot pistols and have posted a few on this site. I am also have an interest in home made guns, other gunsmith sites and video’s on making guns. So this post will cover all these topics at one time.

He has come up with an interesting design and a series of videos to build it.

rat 1There are a couple of solid model  mock ups to let you see how it all works

rat 2

rat 3Now on to the series of video’s.

You can see the rest of his series at his very interesting web page.

http://www.jamesrpatrick.com/2015/03/prt22part1.html

I like the design so much that when I have an opportunity I am going to build one to add to my single shot/home made gun collection.


More on the Kitchen

Saturday was spent working on the kitchen as well as a few other projects. Trying to get it operational by Christmas, trying. We will see. Today’s results allow use to set and start the top at least on the opposite wall.

This first picture is after the cabinets were attached to the wall and the frame built for the desk area.DSC_7244s

DSC_7245sThe stove cabinet has been rebuilt.

DSC_7246sThe 3/4 plywood for the base of the counter top is securely attached to the cabinets and desk area.

DSC_7248s

DSC_7247sAnother fun day.

Making the Sharpes rifle

In my usual time of relaxing and surfing the internet I came across some interesting video’s on the making of the Sharps rifle.

The first is the machining of the receiver.

The next video is making the stock.

This is the barrel making video.

This last video deals with the finish that is applied to the rifle.

I enjoy video’s dealing with gun making. I dope you do as well.

Kitchen up date

When we last looked at the partial remodeled kitchen we had just brought in the recycled cabinets that I obtained from a house demo.

DSC_7084s

From there I have taken all the fronts off and sent them to a company that will strip and refinish them to the color of the other cabinets.

DSC_7114s

DSC_7116s

The problem is that there were still no corner lower cabinets. A little time on solid works and I design the new corner units.

kitchen corner cabinetThe weekend was then spent getting them cut and made. Only one was finished, but all the components were cut for the other.

DSC_7224s The plan is to have the kitchen completed by Christmas.

Sunday computer update

I have been a little remorse in backing up my lab top computer and downloading piles of paper work that needs filing. So a portion of this weekend was slated for that.

There are numerous dvd’s to down load on to the back up hard drive.

DSC_7192sBoxes of drawings and data to down load.

DSC_7197s

DSC_7194sEngineering prints to go through.

DSC_7195sAnd some old duplicate copies to take apart and scan.

DSC_7226sNot my idea of fun but it needs to be done.