Categories

Redesigning the VG1-5 Fire Control Group

A few e-mails and comments on why we are not using the original fire control system have been brought up. So I thought a little clarification would be in order. This is an original fire control group:

IMG_0119as

You will notice the how complex this is and that it is a riveted unit. In addition some of the major components are forged and not just machined from stock. Now while I would like to make this, it is impossible to reverse engineer this without taking it apart. I have yet to find anyone willing to allow me to disassemble this unit. So we have studied the space available in the receiver to allow us to build a fire control system there.

Trigger Housing

Trigger Housing1

This is a  picture of completed fire control mechanism with out the disconnector.

IMG_0023 (2)a

This system is designed to be safe and pass the ATFE tests. I hope this helps with the reasons for the design changes we have made.

Part 3: VG1-5 Receiver Reinforcements

Now that we have the two halves ready to spot weld together we first have to install the strengthen plates to both sides.  The major purpose is to add material for the magazine release assembly. These plates add extra material to make a sturdy mounting area for the magazine release.

Historical note – we are making the second version of the the magazine catch, which is a pretty typical push-button type. The very first examples of the VG1-5 used a long piece of spring steel riveted to the rear side of the receiver and bent to protrude through a hole in the receiver and hold the magazine up. Those didn’t work very well, and the design was changed to the more expensive but much more functional button. Mid-production receivers are not uncommon with the rivet holes for that type of mag catch punched and left unused, presumably done untilt he original receiver stamping tool was worn out and needed to be replaced.

IMG_0055s

And another view.

IMG_0030s

This is the tool that was design and made to produce this strengthening plate. It is designed so that every side is a different angle.

IMG_0021 (2)s

The tool is designed to attach to the fly press.

IMG_0023s

You will see the fly press used in numerous operations as we continue with the project…

IMG_0002crops

Now on to spot welding. The first picture is of a 110 spot welder that was first used. The major problem is the depth of the spot weld. It could just not do the task at hand (although it is just fine for AK lower rails).

110 spot welder 2 small

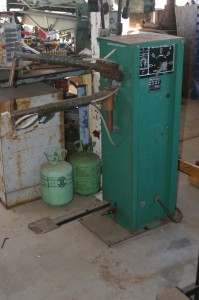
The second spot welder is a 220 unit. It also was not up to the task. With the number of spot welds and  the cool off time between welds it would take forever to complete the project. So the answer was a water cooled unit. I found this one on Craigslist in Phoenix for a couple of hundred dollars.
water cooled spot welder 2 small

Now on to the spot welding. The first thing to do is position the support plates in the proper location.

measure for set up of spot weld small

Next it is time to spot weld.

spot weld support 4 small

Then spot weld some more.

spot weld support 5 small

Once we have completed this task it is time to clamp the pieces together and spot weld the two halves together. With both supports spot welded on.

support spot weld 2 small

It is now time to set up and spot weld the two halves together. First the set up tool (which is the same mandrel used to ensure good bends and angles earlier on).

welding fixture 1 small

And a different view.

welding fixture 4 small

Now on to the welding.

spot weld receivers 1 small

Now the completed spot welded receiver.

receivers ready for welding 2 small

So what you have now is a part that is ready for the first machining step. I will leave you here and with the next post we will start the machining process.

Part 2: VG1-5 Receiver Pressings

Now that you have seen the concept models it is time to get into the nuts and bolts of making this. So the first step is cutting the 16 gauge sheet metal to the proper size. This is no easy task as we do not know what the starting size is. So we cut the flat to the basic die size. These are cut in lots of 10 pieces on a friend’s shear.  Then we press them.  The first set of pressings will give us a basic idea how to proceed.

starting flats

About now you ask why sets of 10. There is a certain amount of movement of the sheet metal on the die as no stops have been placed in yet. Using ten stampings allows us to verify the how the stamping looks. Once this initial set is completed we now adjust the size of the flat to give us the overage required we need for overlap.  So there is another 10 pressings for the scrap bin. Now we look at the stamping to see where we can remove metal and if any cuts need to be made in the blank to give us the correct and proper looking final product. A master is made to work from.master flats

At this point a flat sheet of 16 gauge is taken to the water jet people and cut for the proper shape. Again all we do is 10. Once cut they are all pressed.  Now we should be very close to what we need.  If the pressings are correct we then cut up the complete sheet and press the complete run. Now, as for what we do with all the extra pressings. They are used for a variety of items. Some are used for testing the amp and time settings on the spot welder.spot welding 2spot welding 1

Some are used for doing tig welding. The rest are made into art , if you want to call it that.art 2art 1

Now on to the pressing. The dies are set up in the four poster press that we rebuilt – this is it prior to rebuilding.hydraulic press 008s

Now onto some pictures of press operations…

This shows the properly sized and cut sheet in the dies and ready for pressing.pressing set uppress die set side view

This is a side view of the same set up.

pressing start

Starting of the pressing cycle.

pressing finished 2

Pressing completed.pressing finished 3

As removed from the die.finished pressed flat

A few pictures of the pressing die:press die bottom 1press die top 1

Now with both halves of the receiver pressed it is time to do the touch up work.  The receivers are placed in a mandrel and all the angles tightened up and prepped for spot welding. Each set of receiver halves is clamped together with this mandrel inside to ensure that all the corners are nice and square and the angles completely formed.mandrelThat is it for today. The next post will be adding the side support pieces and setting up for the first milling operation.


GunLab is Back: The VG1-5 Project

Gun Lab is now back into full swing. The objects are still the same. That is discussing the design, prototyping and the building of small arms, their parts and accessories.

The first project is the Gustoff Volkssturmgewehr, model MP-507, and commonly called the VG1-5 in the states. This rifle was designed at the end of World War 2 by the German arms manufacturers and was to be issued to the home guard. For a detailed overview you should read Desperate Measures – The Last-Ditch Weapons of the Nazi Volkssturm published by Collector Grade Publications.

I have always wanted one of these rifles, however with a price tag of $35k to $53k it is way past my budget. So it is time to build one or at least a facsimile of one.

The first hurdle was to design a new fire control system – the original design is nightmarish to make, and still not change the overall appearance of the  rifle.

This is the solid model concept drawing of the fire control mechanism. This model allows me to look at part size and relationship.

New VG1-5 Cutaway

Cutaway view including new FCG (click to enlarge)

New VG1-5 left side

New VG1-5 right side

VG1-5 exploded view

VG1-5 exploded view (original Gustloff FCG design)


Tour of Vltor Weapons Systems

A little while back we had the opportunity to visit the extensive shop that is home to Vltor Weapons Systems. It’s a huge facility, and gives Vltor the ability to do almost every part of a manufacturing process in house – including stamping, machining, welding, bending, laser engraving, and many different kinds of finishing. As a result, they make a pretty wide range of products. Their ARs are their best known work, but they also made the semiauto PKM receivers that came on the market a few years ago, plus AUG receivers for Steyr and complete 40mm grenade launchers for the military. So if you’re interested in manufacturing, check out the video:

Rebarreling a Mauser Action

We had a Yugoslav M48A Mauser with a completely trashed barrel, so we decided to rebarrel it. We have a donor barrel in .308 Winchester, and we’re going to go through the process of removing the old barrel, facing the receiver, threading the new barrel, cutting and headspacing a new chamber, and timing it to the action.

Mounting a Browning 1919 on a Jeep

Rat Patrol!

This project isn’t strictly speaking about gun manufacture, but is related. I’ve had a semiauto Browning 1919 for a while now, and I finally got my 1946 Jeep up and running. Naturally, this means that I must come up with a way to mount the one on the other – my 10-year-old would curse me from the past if I didn’t. So without further ado:

For the detail oriented:
The Browning is an Israeli parts kit currently set up in 8×57 for cheap shooting. It has a Black Bear hand crank for that extra fun factor.

The Jeep is titled as a 46 CJ2A, but has a 3A body and a 185ci Studebaker Champion engine. It’s been converted to 12V electrics, dual fuel tanks, and 11″ drum brakes. The squeaking is from the hood hold-down latches, which will be replaced shortly.


A Visit to American Spirit Arms

It has been way too long since we posted something, sorry guys. Hopefully we will be able to keep up a bit better from now on – and we’re going to start with a tour we just had of American Spirit Arms. They are great folks making a top-quality AR, and graciously gave us free run to look around their factory. We figured we’d focus on the process of manufacturing a lower receiver:

If you would like to take advantage of their deal on the 95% non-firearm lower, give them a call at (480) 367-9540 and mention that you saw us here on GunLab. Do it before November 15th 2012, and you’ll get 5% off – not a huge discount, but it should cover shipping. We’ll be getting one ourselves down the road and doing some video on the process of finishing it, so if you want to follow along when we do, now is the time to grab your 95% lower.

Looking at 1911 Castings

We have a friend in full-scale firearms manufacturing who was looking at making a large run of 1911 pistols. In order to reduce his machining costs, he bought a sample batch of frame and slide castings from Coast Metal Casting – and they turned out to be next to worthless. So we borrowed a set from him to take a look at. What makes a casting good or bad, anyway? Well, let’s see:

If you are interested in seeing how 1911s were mass-produced before the advent of CNC machines, you’re in luck! We have a copy of an article from Machinery magazine printed in 1942, which discusses the process in some depth:

Making a World-Famous Automatic Pistol, by E.P. Herrick, Colt Production Engineer (Machinerymagazine, December 1942)


GunLab visits Hydro Print Services

We recently had the opportunity to drop by Hydro Print Services and speak to the owner, Scott. He offers a really neat 3D printing/coating process which is a cool alternative to traditional firearms finishes. It allows you to have really intricate patterns (far more than you could get by painting or airbrushing), a huge variety of colors, and a finish that isn’t susceptible to rusting like traditional bluing. The options run the gamut from plain solid colors to faux wood grain to camo patterns to zombie collage patterns. Or carbon fiber, snakeskin, diamondplate…you get the idea. There are a ton of options you can see on the company web site.

We think that some guns look best with a traditional blued or parkerized finish, but the creativity that hydroprinting allows is great for personalizing competition guns, homebuilds, and anything else you want to stand out. We had a great time hanging out with Scott, and put together a video discussing the possibilities an actually printing a part (an old AR buttstock) so you can see the process. And to top it off, Scott is offering a 10% discount on all his printing services to the community here – just mention GunLab when you place an order. I know we’ll be taking advantage of that with a couple guns we are sending him. Thanks, Scott!