Categories

Another weekend over and again not enough done

It is Sunday night and I am just about done. This is another post about the hot forging press. I did manage to get most of the piping put in place and made hangers for them. The hoses are hooked up. I just have a few more small items to complete and it will be operational.

dsc_3162sThe front of the press showing the opening for the supply piping.

dsc_3163sThe back of the press with all the hard piping installed

dsc_3164sSupply hard piping with the clamps and supports

dsc_3165sThe pipe clamps were machined and welded then installed.

dsc_3166sAll new hoses were installed.

dsc_3167sFour more hoses to hook up and it will be operational.

The passing of Mike Dillon

It is with a sad heart that I have to post this. For those of you that never had an opportunity to meet Mike you have missed meeting a great guy.  I have a number of fond memories of Mike over the years. He was an amazing man that could seem to remember your name every time you met him even if it was years between meetings.

https://www.dillonprecision.com/rememberingmikedillon.html

Rest in peace and you will be remembered.

Working on the hot forging press

Part of this last weekend was spent working on the hydraulic forging press and the fluting machine for the VG1-5. I started by threading all or at least most of the 3/4 high pressure hydraulic piping necessary. This is a video for the project.

With the hard piping completed all the old hoses were removed and new ones ordered. The pipe supports were also ordered and the throttling valve for the fluting press. Hope to have it together this weekend.

More work on the Router table

Another weekend has come and gone. They always seem to go to fast and I never seem to get enough completed before Sunday night arrives.

Getting closer to finishing the router table project and on the making the stocks for the VG1-5. I did manage to get the the router lifting table installed.

dsc_2888s

dsc_2887sUsing a pattern that was affixed to the table top with double sided tape.

dsc_3008sThen a couple of passes was made with a plunge router to cut out the starting opening. With the basic hole cut it was time to use a jig saw to cut out the rest of the hole. The final result is that it is now mounted.

dsc_3005s

dsc_3007sGetting closer to completion.

Work in the Fab Shop

Okay so there is only two days in the weekend and I am getting older and do not move as fast as I use to. So between the kitchen and the router table we also started on the fab shop addition.

The concrete was poured a few weeks back and with the lack of room in the fab shop I have been spending the extra time working there.

First we moved the hot forging press and made some more room in the forge.

dsc_2882sThen like all weekend something has to break or give you problems. In this case it was the plasma cutter.

dsc_2881sI needed to cut some material for a project I am working on for Axel and Paul and it would just not work. After a couple of hours messing with it and finally finding the manual the problem was narrowed down to the air regulator not working properly. After I removed and re-built it I was able to do a little cutting but not the project of the day.

The walls were started for the fab shop addition. This is one of those projects that can be worked on when time and money are available, which is not often.

dsc_2885sI have had the steel door frames from a demo school job.

dsc_2884sA second door to the casting area will go in the opening

dsc_2883sNot a large addition but one that was needed.

Time spent on the kitchen

With the up coming SAR show my wife really wants the kitchen completed. So more time was spent on it this weekend as well.

The sink and dishwasher are installed and working. The fake fronts in the stove cabinet are made and installed and looks good.

dsc_2890s

dsc_2889sIn addition all the walls have been re-painted and the covers removed, cleaned and reinstalled.

The stove is the next major item. If we can not buy replacement orifices then I will have to make new ones.

More on the Router table

Another busy weekend here at Gun Lab. I did manage to get some time to work on the router table. The work that was accomplished was on the table top for the router table.

The first thing was cut the slots for the biscuits. This was accomplished in both the table top and the oak moulding. The tool that was use was a Porter-Cable.

dsc_2897sIt made quick work of it.

Then the biscuits were glued in and everything was clamped together.

dsc_2896sAfter drying the next step was to add the veneer. This task did not go as smoothly as it should have.

Starting with a full sheet it was cut with scissors over sized. Then coating both the veneer and the table top with contact cement it was carefully placed in position, or not.

dsc_2893s

This is the results of the first try.

dsc_2895sThe second try got it down.

After it was installed the edges were trimmed off using a trimming router bit.

dsc_2898csYou can see the ball bearing on the top of the tool. This allows it to ride against the oak edging while cutting away the veneer and not cut into the table.

After the veneer was set then came cutting the slots. Using a series of router bits we were able to gut the guide slots and the backing guide slots.dsc_2892sPlunge router with a 1″ bit for cutting the guide slots

dsc_2891sAll in all it turn out not half bad.

dsc_2886sNext weekend I will be installing the router lifting mechanism.

dsc_2887s

dsc_2888sIt was a good weekend and I got to try and do new tools and methods. First time with a plunge router. First time doing veneer. First time using biscuits.

Part 2 of the weekend work fest

While Axel worked on the pattern for the stock more was accomplished on the router table.

dsc_2770sAll the drawers have been finished and the top has been glued together, marked out and the moulding cut and fitted. I would have finished the moulding up gut my disk sander

dsc_2772s

gave it up.

dsc_2816sWith no new pads we had to wait until Monday to buy some new pads.

I wanted 100 grit but all Harbor Freight had was 120.

dsc_2818s

Got two of them from the wood working store. 100 grit.

dsc_2817sI really want to finish this project so I can get on to making the stocks.

More going on at Gun Lab

With this post I am happy to note that Axel, a friend of gun lab, is back for a visit and as always we put him back to work. And unlike what most people think of me we did actually allow him some time off to go to the local gun show and stores.

This post is about the continuing work that is being done on the VG1-5.

This weekend was spent working on a number of projects by different people and in different shops.

Axel spent most of his time working on making a stock pattern for the rough cut and the finish router work.

Before I go into great detail on making the stock pattern I have to stress that some people just do not like to change there ways. We have a rather complete machine and wood working shop. So when you see the method that the pattern was make it is all Axel.

It started with a wood blank that was roughed out on the old stock fixture plate.

dsc_2786sThis a really scary fixture to use with a 3/4 horse power router especially toward the grip of the stock. Even though there is a bearing riding against the fixture

dsc_2788sit was still an interesting experience.

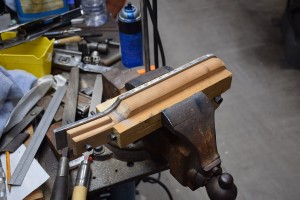
Axel took the rough shaped stock and fitted it to our test rifle.

dsc_2792s

A close up of the fit up.

dsc_2791sThen it was off to make a pattern that would make the same thing over and over but still allow for the minor differences that we are going to encounter.

Now this is the point where German stubbornness comes into play. We will just go back to the fact that we do have a couple of nice work shops and in the saw room is a really nice band saw.

dsc_2779sDid I mention that this tool works great on cutting Aluminum?

He did it the old fashion way  and when you don’t have much in the line of tools you use what you have and become expert with them. This is what Axel did.

He started by attaching the stock to the aluminum plate with the two stock screws and then a third point on the stock to firmly hold the blank to the plate.

He then marked out the stock out line.

Then he went to the drill press and drilled about a thousand holes,that may be a little exaggerated, but the number is close.

dsc_2776sThen he put the stock that he previously fitted to the rifle and and spent quite a bit of time, between guns shows and gun store visits, and files everything away that did not look like the stock.

dsc_2775s

dsc_2774s

When it was all said and over this is what it looked like.

dsc_2781s

dsc_2782s

So now the new process for making the stock will be to lay out the stock with the aluminum pattern, cut the stock out with the wood shop band saw.

dsc_2794sThen using the pattern cut the shape out on the router table using a straight cutter with a ball bearing guide.

dsc_2789sAfter the shape is cut out go back in with a radius cutter to cut the couture.

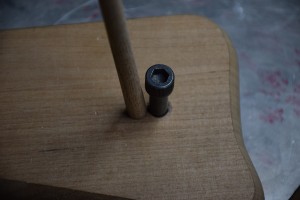
The final set will be to plug the third hole with a wooden dowel.

dsc_2783sMany thanks to Axel for his help this last weekend and we are a step closer to getting done.

Time in the Fab shop

I was able to clean up part of the fab shop today. I am hoping to get the gas forge up and running shortly. Just a couple of pictures of the forge area.

The new vent installed and the gas forges in place. The forging press needs to be moved about 4 feet to the east.

dsc_2703sThe mechanical hammer I built a couple of years ago. The return spring broke this weekend and now something else to fix.

dsc_2704sOne of two leg vises

dsc_2706sMy old anvil that I got from a dumpster. One day I hope to find one in better condition. A project in the near future to build a better stand for it.

dsc_2705s