Again I have some sad news to post. Estes Adams has passed away on June 20th. He was only 69 and apparently he had a heart attack . I only had an opportunity to meet him once but I did chat with him regularly both by email and phone. He was a fountain of information and very giving with providing help in some of our projects. He will be missed.
|
https://www.youtube.com/watch?v=GSRqPorFM0o&feature=youtu.beBabyRuger Mk 1
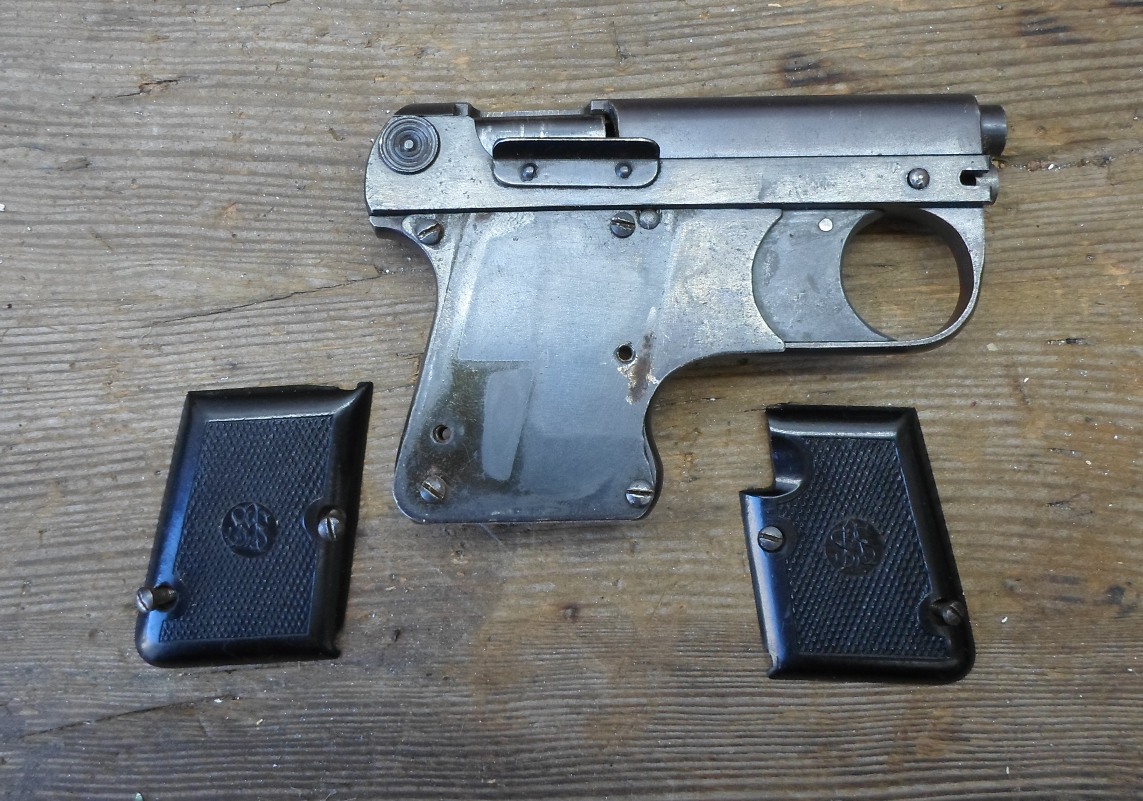
Always was a fan of the classic .22 Ruger MK series pistols. Just didn’t like the disassembly/reassembly procedure. How it all started… Right after coming over to Arizona I found a few Ruger Mk 1 grip frames at a gun show for $20 each! PIC 1
So I had a starting point for one of my long time want to do projects – a Baby Ruger. There are Baby Lugers out there but I couldn’t find a single Baby Ruger. Given the fact that the Ruger MK series is probably one of the most customized and tuned .22 pistols that was quite surprising to me. Anyway – here at Gun Lab we do what we like to do… Since there first was the idea to have a grip safety – just for the looks though, having some hump protruding from the rear of the grip – there was no way to use the original way to keep the rear end of the receiver held down on the grip frame. So I added a tube section to the grip frame, somehow mimicking the contour of the Luger pistol. PIC 2
Next step was cutting down the grip frame by half an inch. PIC 3
After that the original hammer spring housing needed to replaced. PIC 4
Hammer spring assembly had to get a different layout as well. PIC 5
Inbetween, when you get stuck with some technical issue you can handle other stuff that needs to be done anyway – like them grip panels. PIC 6
PIC 7
Next thing was to cut down the barrel to 88mm. Why exactly that length? Just for the looks! Minimum for reliable function without changes to recoil spring and bolt mass I considered to be 78mm. PIC 8A
Got that receiver/barrel assy at gunbroker. I was looking at all the gun shows for some ugly, rusted but still functioning pistol. Of course found it only after I was done with this one… PIC 8B
Maybe I will do something to it some day. Can’t do just-for-the-fun-of-it projects all day long! The front sight was welded from 3 different parts. My first idea was to drill out the original front sight from the cut off barrel, but it didn’t fit (visually) to the shorter barrel. After searching for a while in the huge stockpile of gun parts here I finally decided to make it from scratch. PIC 9
If you assemble all the separate parts you were working on all the time there will be some minor adjustments necessary for the gun to work properly. So the magazine needed to sit a trifle lower since the bolt was slightly rubbing against it. The bolt stop pin needed some fitting – it didn’t wanna go all the way in with the recoil spring assembled. The idea of the grip safety got dropped in the process of building that baby. There was no technical need for it right from the start – just that visual thingy. And there is simply not enough space for adding that feature. The simplified disassembly/assembly method connected with that initial idea survived though. So after quite a bit of work there you get your piece of gun porn… PIC 10
PIC 11
PIC 12A
PIC 12B
PIC 13
PIC 14
PIC 15
PIC 16
The trigger (besides the grip panels the only non-steel part) on my sample was not properly fitted to the frame and thus did not reset correctly. That doesn’t seem to be an isolated incident. Way down on the following website a user is describing the same issue. https://www.nationalgunforum.com/semi-auto-handgun-discussion/53800-can-you-identify-gun.html There are some excellent german websites regarding blank guns. Some of them referred to in the following. https://www.tactical-dad.com/waffen/schreckschusswaffen/ass-33-6-lacrimae-gaspistole-ohne-ptb/ Below on this website there are 2 videos showing a post WW2 Wadie blank/tear gas pistol using the same operating system and actully ejecting shells. https://www.tactical-dad.com/waffen/schreckschusswaffen/wadie-automatik-gaspistole-ohne-ptb/ First video has a misfire first as well and he describes lots of sparks coming off the ejection port and in his face. He fired 3 blank cartridges total and at two of them the primer had set back a little and on the third one it was pushed out completely. At that gun most of the parts are made of zinc alloy including barrel and frame/bolt face. Only some small parts like firing pin, trigger bar, springs are made of steel. Sadly I couldn’t find any information on the maximum gas pressure. Can’t be that much considering the zinc alloy design and the shells not being supported in any way and have to hold the gas pressure on their own. Ammunition was made well into the 60’s. Post WW2 ammo has aluminum shells which seem to be more thick-walled than the older brass shells from the 1930’s/40’s. The pistol apparently needs very precisely dimensioned ammo. Just 0.1mm below and you are getting ignition problems. Just 0.1mm too long and you have difficulties to fumble them in the ejection port. On the same website there is an article on another pistol (HS4) using the same ammo/principle and there you can see in one of the pics an enlarged gas channel/groove on the left side partially covering the left barrel entrance and the receiver/frame side wall. Thus giving a little bit more gas pressure for the shell ejection. https://www.tactical-dad.com/waffen/schreckschusswaffen/gas-alarm-pistole-hs4-ohne-ptb/ Some more interesting links I stumbled across: http://www.poplasnak.cz/b/august-schuler-suhl/ https://www.gas-waffen.de/srs-waffen/august-sch%C3%BCler/ https://www.gas-waffen.de/srs-waffen/august-sch%C3%BCler/modell-33-6/ https://www.gas-waffen.de/srs-munition/8-mm-lacrimae/ http://www.ammo-one.com/8mmTeargascenterfire.html
In the last post the high speed video was of the first generation VG1-5 that was built a number of years ago by John. What we here at Gun Lab did was start and finished the first 5 VG1-5 rifles. The remaining weapons are currently being built but the first 5 are going through very serious testing. The rifle in this video is number 7. Enjoy the video.
Again my thanks goes out to Axel and Carl and Ian from Forgotten weapons. There help in this phase of testing and the use of Ian’s high speed camera was a great deal of help. Sunday Axel and I got together with Ian and Carl from Forgotten Weapons to do some high speed photographing of the VG1-5. The information that was obtained holds a number of clues to re-occurring issues that have come up. For the next week or so I will be posting high speed and standard videos of all the VG1-5’s, the 05, 06 and stg45 rifles. Here are a couple of pictures of the rifles tested. The first is the VG1-5’s
The second is of the 05, 06 and stg45.
The first video in the series. This one is on the VG1-5 first prototype rifle that was made years ago by John. This rifle has had more rounds put through it then can be counted. These include reloads,WW2 German steel case, Czech post war steel case and all the different types of factory ammo that was made.
For any of you that have been around awhile or have not been on the far side of the moon you would know of Don Bell at Omega. The sad news is that he passed away last night. I have been to his place to many times to count and he was always a generous and friendly friend to me. I will miss him and visiting his shop. R.I.P. you will be missed. I have a number of belt loaders and one that I picked up a number of years ago is the MG-51 belt loader. This is a Swiss belt loader originally design for the Swiss Maxim gun. Later they were converted from the cloth belt to a metal belt for the MG-51.
In this case the loader has been converted to 8×57 and uses the MG-34/42 belt.
As packed in the box.
A couple of views of the loader. This is the video of me loading up a belt of 8×57 for the MG-34 and MG-42.
A while back a friend of gun lab brought over a new press. It will really help with some of the pressings that we have coming up, however it is a 7 1/2 HP 3 phase motor.
I have nothing in the fab shop that can handle that power requirement. My phase converter is a 7HP rotary phase converter. Well worry no more. On Thursday came a knock at the door with the opening statement “friend of gun lab” and I am barring gifts. On his trailer was a 15 HP rotary phase converter with a fabricated stand.
Thanks to John U. for the phase converter. Side note is that all the Budweiser aluminum in the drying rack in the back ground are for the metal casting project coming up and they are not mine. They all come from a certain German fellow. This Sunday we spent 6 hours testing a variety of weapons. A few more VG1-5 rifles were tested. The MG-34 had all the springs replaced and was tested as well as the mpi-69. This is a quick video of what was 6 hours of actual work and testing.
A while back I was a construction site where they were removing a number of trees. One of them in particular was a large and fairly straight Mesquite tree. The guys were going to cut it up for fire wood and that just kind of pushed the wrong buttons for me. After a little chatting with the superintend I convince him to let me have it. This is the log and a few of the limbs.
After some clean up this is what I was left with.
The scrap was turn into mulch.
It is all back home.
and stored for an upcoming project.
It will be stored for a year to air dry out the sun and rain and then it will be kiln dried to the proper moisture content. I cut these slabs at 2 1/2 inches for stocks and to be able to re-saw for a few other projects. A short video of the process.
|
||
|
Copyright © 2026 GunLab (KnownHost) - All Rights Reserved Powered by WordPress & Atahualpa |
||